Saturday, March 16, 2013

It's spring!

I know we technically have another week until spring, but all the plants are budding out here.  We had a lovely day yesterday, with a high of 83!

I won't be doing much posting for awhile.  I had surgery on my right elbow on Tuesday (3/12), and so I'll be limiting my keyboard use for a few weeks.  So, I'll make a short post every few days and post some spring planting and flowers until I'm back to normal.

So, here's a spring picture from last year just to start out for today.

Have a good day & stay healthy.

Variegated lilac
 

Sunday, March 10, 2013

A beautiful day

Oh yesterday was so beautiful.  Sunny and warm.  The high was 74!  We all got outside as puttered around for awhile.  I played fetch with the dog.  She chased that evil chipmunk that lives in the woodpile.  She just hates that poor little guy.
On evil chipmunk watch

I moved some of my birds around.  You see, I had 4 bantam chickens in one "chicken tractor".  Two roosters and a hen with her baby.  Well, the baby has grown up and turns out to be ANOTHER rooster.  So that meant I had 3 roosters and 1 hen.  Not good.  So, baby Snow (not much of a baby anymore) and his father Fred got put in another cage.  (The weather didn't cooperate this morning.  It's pouring rain.  So I don't have any bird pictures for now.)


But before I could move them, I had to move 2 quail rooster out of the cage.  I set up a small cage I had used for a quail pair last year.  Now I have 3 quail roosters without any mates and 2 bantam roosters without any mates.  I'm blessed with roosters it seems.

I usually try to give roosters away.  Surely, there must be SOMEONE in our area who needs a rooster.  I know we could have them for Sunday dinner....  but these are my friends.  I'll try finding them a home first.

My 2 Rhode Island Red hens, Sissy and Missy, and their husband Hexter are all molting right now.  So I'm not getting any eggs from them.

Sissy and Missy


 And my young Black Copper Moran hen Jet is molting also.  She's laying about every other day...  So my Brahman Cochin trio are the only ones producing faithfully.  My little Bantam hen Pebbles is trying, but I think the roosters were eating the eggs sometimes.  Maybe now that I have Fred and Snow in another cage she'll have a chance.  I think I'll let Pebbles raise another clutch on her own.  She's a good mama and raised Snow well through the winter.

I haven't been posting much the past week.  My elbow is very unhappy!  I had an appointment with the orthopedic surgeon last Wednesday.  I need to have outpatient surgery to remove the bone spurs.  That will happen on Tuesday (3/12).  Depending on what he finds happening in there, I might just come home without any cast at all.  I would really like that.  I'll have a follow-up appointment within a week and find out more...

This elbow difficulty is painful.  And it puts me behind in everything.  I have to get one of my guys to move heavier things for me (heavier being about 10 pounds).  Even kneading bread was very painful!  This sucks!


Sunday, March 3, 2013

Playing with fermentation

Yesterday, our friends Jim and Beth Saxe brought us some "fresh from the cow" whole milk.  Man, I'm excited.  So, I decided to spend the day making "fermented" food.

You see, my friend Gena Stout brought me a kombucha "mother" last week.  And it's been fermenting for the past 8 days, so it's time to remove some of the liquid and refresh it.

OK first to the milk.  I'm going to make it into cheese.  I usually get my milk from my friend JoAnn McElderly.  But she has a large family and so I've kinda been squeezed out.  So when Beth offered to pick up my jug and bring me some milk I was very enthusiastic!  Yes Yes Yes!

I usually make a batch of mozzarella cheese, then process it a second time and make ricotta.  The left over whey goes into a batch of bread.

But today I decided to try a new recipe.  Feta is a cheese we really like, so I decided to try making it.

I get all my cheese making supplies from The New England Cheese Making Company.  Here's the link to their site.  New England Cheese Making Company

I decided to learn to make cheese after Gena came over one day and taught me how to make mozzarella and ricotta using the microwave.  That was a fun day!  And boy that cheese is tasty!  That's when I decided to get my own cheese making supplies and some books.  I started with the Complete Home Cheese Making kit.  Complete Home Cheese Making Kit.  Don't forget to order red wax if you want to make some hard cheese.

Later, I also got the The Deluxe Goat Cheese Set Deluxe Goat Cheese Set.

The recipe I'm going to follow today for Feta is found on page 7 of their little handbook from the Home Cheese Making Kit.

Feta Cheese
1 gallon whole mike
1 packet Mesophilic direct set culture
1/2 rennet tablet crushed and dissolved in 1/4 cup cool water
Cheese salt for brine

I started by heating the milk slowly to 86F using the indirect heat method.

Heating the milk
I then added the started culture and stirred.  I kept the milk at this temperature for 1 hour.


The culture is very important.  Different cheese are the result of different cultures.  This direct set culture gives the milk the distinctive flavor associated with Feta cheese.  Having the right culture for the cheese you want to make is very important.  After making this batch of cheese, I need to order more of this particular culture.


While I was holding the milk and culture at 86F, I crushed my vegetable rennet tablet and dissolved it in water.  I only needed 1/2 a tablet.


Here it is, dissolved.


After an hour had passed, I added the rennet to the milk and allowed it to rest for another 1/2 hour.

Milk with culture and rennet resting at 86F

While the milk was resting, I started working with my kombucha.  I hadn't tried kombucha before.  Gena is a real fan of it, so I thought I'd give it a try.  Here's a Wikipedia article about kombucha.  Kombucha.

If you're interested in starting a kombucha culture and don't have a friend with some SCOBY to share, here's a site that can help you get started.  http://www.kombucha.org/

The SCOBY is the "mother", the culture.  SCOBY is an acronym for symbiotic colony of bacteria and yeastAgain, here's the Wikipedia link.  https://en.wikipedia.org/wiki/SCOBY.

It doesn't look so bad...  Here's mine, after 8 days.

Kombucha with scoby on top
I simply used a ladle to remove most of the liquid, filtered it through a coffee filter and put it into a new jug.  I hope to invest in a ceramic crock with a tap so I won't have to use a ladle to get my daily dose.  But for now, this is the method I have to use.

The dark jug will help keep my tea fresh

I put a small piece of my scoby and a little liquid aside for another friend who wants to try it.

To add liquid to my culture, I simple made a new batch of sweet tea the way I always do.  Once it was cool, I poured it into my kombucha vessle.  Here's what my finished kombucha tea looked like.

Kombucha tea is slightly sour and fizzy


I still had to time to let my cheese rest, so I decided to make some pickled eggs.  My banty hen Pebbles has been laying up a storm!  I have 15 eggs from her and I'm not ready to incubate them... so pickled eggs it is!

To make pickled eggs, you start my hard boiling your eggs.

Then you have to put pickling spices in vinegar.  I got my recipe from an old cookbook I have from 1955 "The Culinary Arts Institute Encyclopedic Cookbook" by Ruth Berolzheimer.  The recipe I'm using is on page 307.

Pickled eggs
2 tablespoons sugar
1 teaspoon salt
1 teaspoon mixed spices
2 cups vinegar
12 - 16 eggs

Since Banty eggs are so much smaller, I added 6 large eggs from my Cochin chickens.

I used McCormick pickling spices.  I boiled the eggs for 15 minutes.  Then I drained them and then covered them with cold water.  I left these to set for about 1/2 hour while I went back to my cheese.

By now, my curd had formed and was nice and firm.  The curd is adequately firm when you see it separating from the edge of the vessel and when a finger inserted makes a clean break.  It looks like this.

Curd "breaks" when touched

I broke the curds up, then let is rest for 10 minutes.  While it was resting, I cracked my eggs and put them into the jars with vinegar and spices.  Here's the finished product.

Eggs in vinegar and spices
Now the jars go in the fridge for 7 - 10 days.  These eggs will keep for several months.  I could also heat the jars in a pressure cooker and seal them.  They'd stay good for several years that way.  But we eat our eggs much too quickly to bother with canning them.

Now, back to the cheese.  I gently stirred the curd and slowly raised the temperature to 96F.  I stirred it every 10 minutes or so.  The curd sinks to the bottom and the whey comes to the top.

Curd on the bottom, whey on the top

I lined a colander with cheese cloth and poured the curd into it.  The whey just filtered right through.  I want to make some bread using the whey, so I saved it.  Here's a picture of the curd draining.


And the whey collected at the bottom.


I transfered the curd to a fine mesh bag and hung it to drain.  I squeezed as much whey out as I could.

Curd draining
After it had drained for 45 minutes, I placed the entire bag into the brine solution.

Curd in brine
The brine is made from 1 1/4 pounds non-iodized salt (cheese salt) in 1/2 gallon cool water.  I also added 1 tsp calcium chloride and 2 1/2 teaspoons vinegar.  The cheese will remain in the brine for 12 hours.  It should be stored at 45 - 55F, and eaten within 10 days.

Now that I had my whey, I could start my bread.  The recipe I will be using comes from the New England Cheese Making Company brochure "Goat Cheese" on page 5.

Whey Bread

4 cups whey
2 tablespoons honey
4 tablespoons bacon fat or tallow
1 1/2 tablespoons dry yeast
4 - 6 cups white flour
1 tablespoon salt

The whey was already warm.  I heated the honey and bacon fat until it was warm (about body temperature).  I added the yeast.

Bacon fat, honey and yeast

I added this to the whey.  I then added enough white flour to make it the consistency of honey.

The dough, ready to set aside
I took my thin dough, covered it with a towel and placed it near our wood fire.  Later this afternoon, I'll add the 4 cups flour and salt, knead it for 10 minutes... and bake it following the same procedures I did earlier this week when I baked bread.

I'll post pictures of the bread as it's rising and when it done.  That will probably be tomorrow morning.

Update 3/4/13

Here's the picture of the bread after it came out of the oven.  It tastes as good as it looks!

Saturday, March 2, 2013

Trips to town & other miscellaneous stuff


Yesterday, our friends Michelle and Jerry came for a visit.  They're a nice, young couple who live about an hour away in Bono, AR.  We met Michelle about 5 years ago when we were doing a spinning demonstration.  She came up and asked John if she could try spinning on his wheel.  We've been great friends ever since.  Michelle met Jerry at her workplace.  They started dating, fell in love and got married.  We don't get to see them as often as we'd like, but they come and visit when they can.

Jerry and Michelle Friend at a reenactment


The five of us visited for awhile and then Michelle and I made a trip to town.  First we visited Sugar Creek Goods, owned by my friend Vicki Husk-Mann, and spent two hours at the knitting circle.  That was a lot of fun.  Unfortunately, Vicki was under the weather.  Hope you're feeling better today, Vicki.

Vicki Huskey-Mann

 Sugar Creek Goods Facebook page


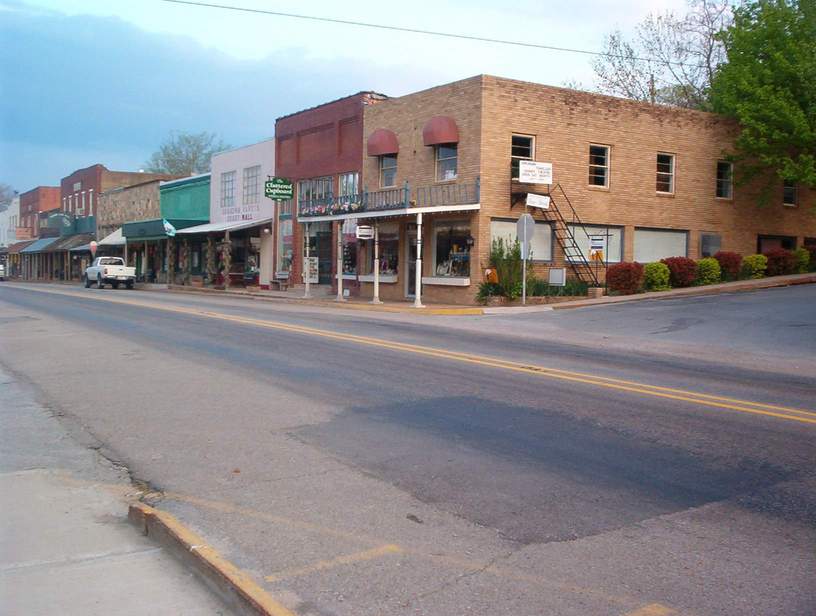
After knitting, we headed to the bank and post office in Hardy.  Hardy is a great little town.  It's kinda dead in the winter time, but come the warm weather it's a hopping place!

 Hardy city demographics and more data


Main Street Hardy


Then we decided to grab a bite to eat.

So, we stopped in at Words Afterwords.

Words Afterwords


That's a really great place to eat lunch, find a good book to read or listen to live music.

I was at a seed swap there earlier this year.  That was alot of fun.


But I digress!  So, who did we see at Words?  Why my good friends, Karna and Erika.  What a wonderful surprise!
 

Karna McFadden


Erika Schindler


We had a great lunch.   Here's the link to Erika's blog.  Erika's Craft Corner

Michelle and I then headed home to see what our men were up to.  Jerry had also headed to town to run some errands.  And we beat him back.  John and Josh were puttering around, waiting for the mail to come.

They made their daily trip to the mailbox (taking the farm truck), one of their favorite daily activities.

The farm truck


Peanut and I headed out to make sure all the birds were fine.  And all was.

We got some checks in the mail, so Michelle and I headed back to town to make the deposits.  While we were there, we decided to stop at one of my favorite little clothing stores.


Jade's

We looked around a bit.  Earlier in the week, I had seen a cute little dress on their Facebook page.  And I found it.


A cute little cream and brown dress I wanted to try on


It turns out they had one in my size, so it came home with me!  I'm not usually a "shopper",  but I do like finding a bargain.

Some of my other favorite stores in Hardy included the following:

Ozark Classic Craft Mall


Hardy Pottery


So, if you happen to be in Sharp County Arkansas; check out our little town.  Have some food, go shopping and enjoy yourself.


Tuesday, February 26, 2013

Windy nights and hurting elbows

It was very windy and rainy last night.  Another wind chime got broken!  Darn it!  And the rocking chair on the front porch got blown off!  That has NEVER happened before.  Good grief!
A windy night, for sure!

My elbow has really been bothering me.  I've been trying to finish this sweater for about 2 weeks.  But I can only knit for an hour or so at a time.  Then my hand goes numb.  Typing doesn't help at all!  Even scrolling down the page to look at Pinterest or Facebook is getting painful...  So I guess I need to make that call and get on with getting the repairs done.

Anyway... I finished a sweater I started back in October.  It got put aside for Christmas knitting.  So, it's been going slowly.  But now it's finished.


It's made with yarn from Knit Pics, called Wool of the Andes.  The color is Queen Anne.  I love anything in the peach/melon/orchid hues. 

I wanted to have some ruffles, so I added a crochet lace edge.  I'm very happy with the way it came out.


I found a nice pewter pin to use for closure.  I didn't want any buttons.

See that darn elbow brace peeking out?  I guess it helps, if only to remind me not to be stupid.

But I'm a slow learner.  It takes me a long time to admit I need to change what I'm doing.  I guess pain and a numb hand are the price I have to pay for being so stubborn. 

Friday, February 22, 2013

Ice storm and preparedness

We experienced another ice storm yesterday.  When I got up at 5:00 AM, it was only 26 degrees.  It wasn't raining out yet.  By the time I headed out to care for the chickens, it was 28 and drizzling.

Yes, liquid rain was falling at 28F.  And it froze as soon as it hit the ground.

As the day passed, we lost power twice.  Once for about 2 hours during the late afternoon.  It was 31 degrees outside.  We weren't worried because it was still light outside.  We'd already eaten lunch and Josh had the fire going in the fireplace.  We just went on about our afternoon.

Once the power came back on I decided I'd better do up the dishes and get out the oil lamps.  Now, here was a problem.  It seems that only 3 of the lamps had oil in them and I couldn't locate the bottle of oil we keep on hand.  I searched everywhere, but no oil was to be found.  Crap!  So, I put lamp oil on the list for our next trip to town.

We were also out of potatoes.  I had used the last 3 on Wednesday when I cooked pork roast.  And we're out of carrots.  I'm not really worried about that because we have home canned carrots and potatoes.  But I added them to the list of things to get.

While I was up puttering around, I filled all available bottles with water - just in case.  I keep about 30 gallons of distilled water on hand at all times.  But, I filled some various 2-liter jugs and such with well water.  And since it was raining outside, 5-gallon buckets of water (very COLD) were available for toilet flushing if needs be.  I also filled up the Big Berkey.

I decided NOT to bother getting out the Water Bob and filling it up.  Heck... I don't want to open it and use it (it's designed for 1-time use) unless I was really sure I'd need it.

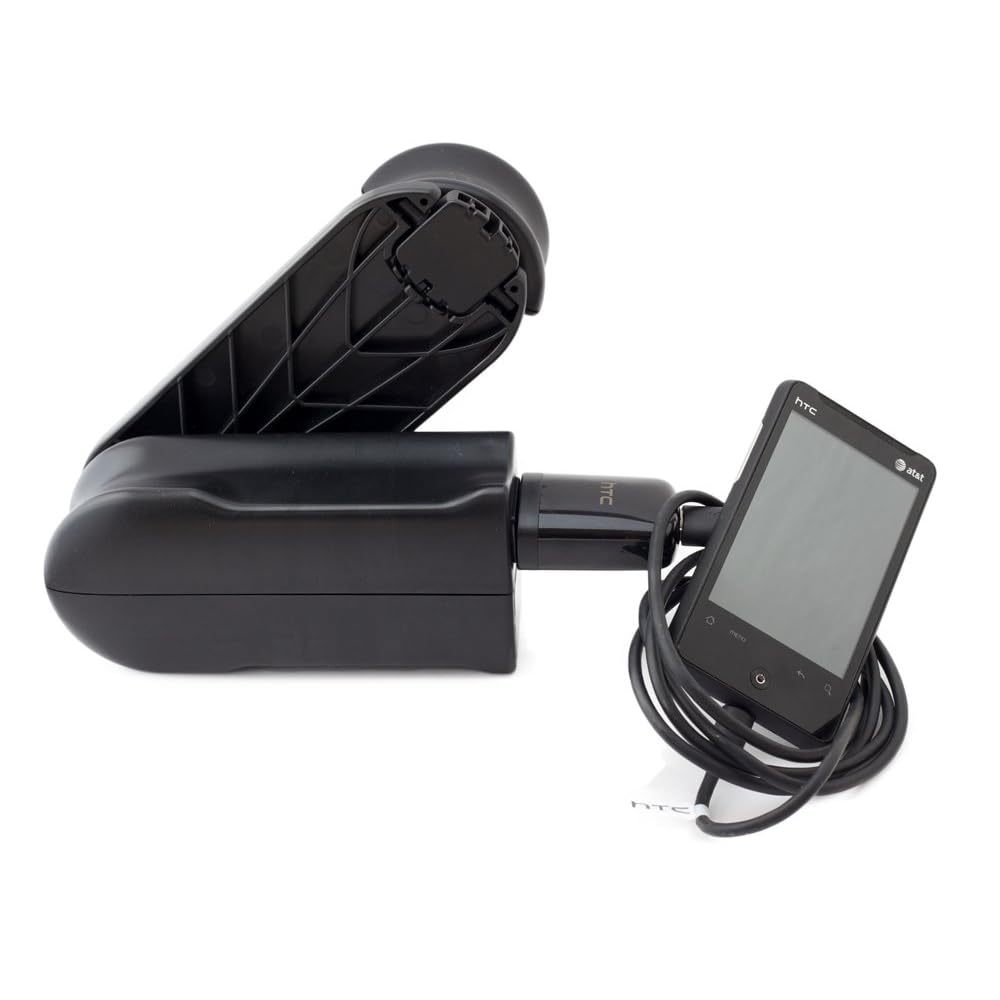
We had plenty of batteries on hand.  Plus I had just invested in a K-Tor Pocket Sock hand crank generator.  It's a portable power supply that provides 10 watts, 120 volts.  Best thing, it's made in the USA!
Pocket-Socket-Generator-Portable-Supply


Later in the evening, the power went out a second time.  But the outage only lasted about 45 minutes this time.  No biggy.

When I got up this morning, it was 31F.  By the time I got outdoors to start taking care of the birds, it was 33 and the ice had started melting.  I measured the ice at 1/4.  Not awful.  And the world was lovely!

Here's what it looked like.

Measuring the ice


The ice was 2/3's of an inch.  Subtracting for the twig and dividing by 2 - 1/4 inch of ice.
Lilac and peaches covered in ice on the NE side of our house


The west side of our house


Facing east
When I went out to the chicken houses... I found them totally encased in ice.

Ice encased bird cage
When I opened this cage, the birds were perfectly happy.  The water was still liquid.  I'd say it was about 45 degrees in there.  All that plastic really made a difference.  There is only 2 birds in this cage, Henry and Jet.  And she was happy enough that she laid her egg during an ice storm!  What a gal!


No frozen combs or frost bitten feet.  Just happy chickens.

The chickens and guineas in the larger cage were equally happy, although the guinea made their displeasure at being confined well known.  Greta laid her egg, just like always.  Sissy and Missy weren't as industrious.  The bantam chickens in the cage in the background of this picture were equally warm and happy.  Pebbles laid her egg yesterday as well. 

We weathered the ice with no problems.  I'm aggregated with myself for not having lamp oil on hand.  That could be a real problem if the power outage had lasted a few days.  Thankfully, it was not a big deal.


Tuesday, February 19, 2013

Baking bread & making chicken noodle soup

Yesterday, when I checked the weather forecast I saw we were in for 2 days of nasty weather.  It was warm but very rainy yesterday.  We got 3/4 inch of rain yesterday.  At times it was VERY windy.  At one point, we couldn't even see across the yard.

Since we had 2 days of yuck ahead of us, I decided to start some sourdough-type bread.  My favorite cookbook is the Better Homes and Gardens cookbook.  You know the one - red & white checked.

My go-to cookbook
The bread recipe I'm using today is on page 137 "Artisan-Style" French Bread.  I like this recipe very much.

First, it doesn't use any refined sugar, butter or other fat, or any dairy.  So it's great for those who are lactose intolerant.  The recipe calls for rye flour.  I substituted some 6-grain cereal.  I use King Arthur unbleached flour.

King Arthur Flour


I prefer King Arther flour because I like the flavor.  It's a little bit "sweeter". 


I will also sprinkle the same 6-grain cereal on top of my bread just before I put it in the oven.

6-grain cereal

To make the starter, I mixed 1 cup of warm water with 1/4 teaspoon active dry yeast.  I set this aside and left it for 5 minutes.  In a separate bowl I combined 1 cup of unbleached flour and 2 tablespoons of 6-grain cereal. When the 5 minutes were up, I poured the water/yeast mixture into the flour and thoroughly mixed it with my trusty wooden dough paddle.  I covered the bowl with plastic wrap and 2 dishtowels.  I then let it sit on the kitchen island for 24 hours.

So, here's what the started looked like after working for 24 hours.
Sourdough starter
The starter is VERY sticky.  It's a bit bubbly.  And it smells very yeasty.  Not "sour" per say.

The little flecks you see are the cereal grains.  This will add some nice texture and flavor to the dough.

Before I did anything further to the starter, I got my work area prepared.  Here's all the different items I use.

My bread pan


My flea market find!  It's great for baking bread.

My kitchen island work station
Floured kneading board

See the bread starter there in the covered bowl?

When John and I were designing this kitchen island from an old dresser and a discarded butcher block that we found in the barn I made sure the top was at the right height for kneading bread.  With my wonky back, I can't be bending over at the waist.  And so this island is higher than most.  It's just the way I like it.


I had to put flour on my kneading board in preparation for kneading the bread.   This board is plastic rather than wood.  It has a nice elasticized cotton cover which can go right in the washing machine.  It also has nice rubber feet, so I doesn't move around when I'm kneading.  I really like that. 


Starter with flour and water added
Once I had my work space all prepared, I uncovered the dough starter and added 1 cup of warm water.  I stirred this in very well.  Then I added another 3 cups of flour.    I worked this in well.  I then turned the dough out onto the kneading board and worked with it until it wasn't sticky any more.  I then let it rest for 20 minutes to allow the new addition of flour to start working with the yeast.

Resting dough
Kneading dough - goofy face and all
Then I poured some additional flour onto the kneading board (but NOT onto the dough) and began kneading.  As I worked the dough over and over, I slowly incorporated this additional flour.  The trick here is to add enough flour that your dough isn't sticky any more, but not so much it becomes stiff.  It should be a bit glossy and smooth "as a baby's butt".  My mom taught me to knead bread when I was little... maybe 5 or so.  It's still one of my favorite kitchen chores.  I love kneading and baking bread.  And the smell of home baked bread is one of my primal "home" scents.  Bread warm from the oven with butter.  Oh man, I'm in HEAVEN!

Oops, I'm getting distracted and making my stomach growl.


Dough after kneading

After I've kneaded the bread to perfection, I place it in a clean bowl.  I cover this with clean plastic wrap and set it aside to double in size.  About 2 hours.


Now, while the dough is rising I'll start the chicken noodle soup.  Using the same cookbook, I found the recipe on page 497.  Old-fashioned Chicken Noodle Soup. Making chicken soup from scratch is very easy.  It just takes some time.

Chicken thighs


Thaw your chicken the night before.


Brown your chicken
Pour some olive oil in your dutch over and heat it.  Place your chicken in, and brown it well.  I also salt the chicken at this time, because I find it penetrated the chicken better than it would if I just added salt once I add the water.


Once it is well browned, cover it with water.


Cover with water and simmer until tender

Now lower the heat and let this simmer for several hours.

Once the chicken is thoroughly cooked, remove it from the broth and let it cool.  Remove the skin and bone.  Cut the meat into bite size pieces.


Add the egg noodles and carrots to your broth and cook for 8 minutes or until tender.  Add the meat back into the broth.  That's it.   It's done!


Sliced carrots


Yummy chicken noodle soup


Now, back to finishing the bread.

Once the dough has doubled in size, I get my cast iron pan heating in the oven (350 F).  That's important because it takes so long for the pan to get up to temperature.  If it's not up to temperature, it dramatically increases the baking time of the bread.

As the pan is preheating in the oven, I punch the dough down 1 more time.  If I'm making 1 large loaf I just knead this batch for about a minute and then let it rest for maybe 10 minutes.  If I'm going to make rolls, I'd start dividing this into balls about 2/3's the size I want my rolls to be.

Once the pan is up to temp, I put my dough in.  I then rub butter or olive oil on to help form a nice crust & then  sprinkle some of the 6-grain cereal and some sunflower seeds on. (Darn, I forgot to take a picture!)

Baking the bread at 350 takes about 60 minutes.  If you're baking rolls you can increase the heat to 450, and they'll be done in about 20 minutes.  You bread or rolls are done when they make a nice "thunk" when you snap them with your finger.  I always make a small slit into the top of a loaf to make sure it's baked all the way through.

Finished bread


This bread has a nice fine texture and is very tasty. 


And here's what our dinner looked like.  YUMMY!

Bread, soup and tea